(→List) |
(→List) |
||
| Line 7: | Line 7: | ||
=List= |
=List= |
||
{| class="wikitable sortable" |
{| class="wikitable sortable" |
||
| − | |+ |
||
! style="position: sticky;top: 10px;" |Icon |
! style="position: sticky;top: 10px;" |Icon |
||
! style="position: sticky;top: 10px;" |Name |
! style="position: sticky;top: 10px;" |Name |
||
| Line 18: | Line 17: | ||
! style="position: sticky;top: 10px;" |Turn speed |
! style="position: sticky;top: 10px;" |Turn speed |
||
! style="position: sticky;top: 10px;" |Ergonomics |
! style="position: sticky;top: 10px;" |Ergonomics |
||
| − | !Weight |
||
| − | (KG) |
||
|- |
|- |
||
![[File:3M icon.png|250x800px|frameless|link=Module-3M bodyarmor]] |
![[File:3M icon.png|250x800px|frameless|link=Module-3M bodyarmor]] |
||
| Line 31: | Line 28: | ||
|<font color="red">-3%</font> |
|<font color="red">-3%</font> |
||
|<font color="red">-1</font> |
|<font color="red">-1</font> |
||
| − | |8 |
||
|- |
|- |
||
![[File:PACA icon.png|250x800px|frameless|link=PACA Soft Armor]] |
![[File:PACA icon.png|250x800px|frameless|link=PACA Soft Armor]] |
||
| Line 43: | Line 39: | ||
|<font color="red">-1%</font> |
|<font color="red">-1%</font> |
||
|<font color="red">-2</font> |
|<font color="red">-2</font> |
||
| − | |3.5 |
||
|- |
|- |
||
![[File:PACA Rivals Edition icon.png|190x190px|frameless|link=PACA Soft Armor (Rivals Edition)]] |
![[File:PACA Rivals Edition icon.png|190x190px|frameless|link=PACA Soft Armor (Rivals Edition)]] |
||
| Line 55: | Line 50: | ||
|<font color="red">-1%</font> |
|<font color="red">-1%</font> |
||
|<font color="red">-2</font> |
|<font color="red">-2</font> |
||
| − | |7 |
||
|- |
|- |
||
![[File:6B2 Icon.png|250x800px|frameless|link=6B2 armor (flora)]] |
![[File:6B2 Icon.png|250x800px|frameless|link=6B2 armor (flora)]] |
||
| Line 67: | Line 61: | ||
|<font color="red">-3%</font> |
|<font color="red">-3%</font> |
||
|<font color="red">-7</font> |
|<font color="red">-7</font> |
||
| − | |4.1 |
||
|- |
|- |
||
![[File:UNTARArmorIcon.png|250x800px|frameless|link=MF-UNTAR armor vest]] |
![[File:UNTARArmorIcon.png|250x800px|frameless|link=MF-UNTAR armor vest]] |
||
| Line 79: | Line 72: | ||
|<font color="red">-6%</font> |
|<font color="red">-6%</font> |
||
|<font color="red">-8</font> |
|<font color="red">-8</font> |
||
| − | |8.5 |
||
|- |
|- |
||
![[File:Zhuk-3 Press armor icon.png|250x800px|frameless|link=Zhuk-3 Press armor]] |
![[File:Zhuk-3 Press armor icon.png|250x800px|frameless|link=Zhuk-3 Press armor]] |
||
| Line 91: | Line 83: | ||
|<font color="red">-4%</font> |
|<font color="red">-4%</font> |
||
|<font color="red">-5</font> |
|<font color="red">-5</font> |
||
| − | |5.2 |
||
|- |
|- |
||
![[File:6B23-1icon.png|250x800px|frameless|link=6B23-1 armor (digital flora pattern)]] |
![[File:6B23-1icon.png|250x800px|frameless|link=6B23-1 armor (digital flora pattern)]] |
||
| Line 103: | Line 94: | ||
|<font color="red">-5%</font> |
|<font color="red">-5%</font> |
||
|<font color="red">-9</font> |
|<font color="red">-9</font> |
||
| − | |7.9 |
||
|- |
|- |
||
![[File:BNTIKirasaNarmorIcon.png|250x800px|frameless|link=BNTI Kirasa-N armor]] |
![[File:BNTIKirasaNarmorIcon.png|250x800px|frameless|link=BNTI Kirasa-N armor]] |
||
| Line 115: | Line 105: | ||
|<font color="red">-5%</font> |
|<font color="red">-5%</font> |
||
|<font color="red">-6</font> |
|<font color="red">-6</font> |
||
| − | |4.1 |
||
|- |
|- |
||
![[File:THOR Concealable Icon.png|250x800px|frameless|link=NFM THOR Concealable Vest body armor]] |
![[File:THOR Concealable Icon.png|250x800px|frameless|link=NFM THOR Concealable Vest body armor]] |
||
| Line 127: | Line 116: | ||
|<font color="red">-4%</font> |
|<font color="red">-4%</font> |
||
|<font color="red">-3</font> |
|<font color="red">-3</font> |
||
| − | |9 |
||
|- |
|- |
||
![[File:6B13 assault armor icon.gif|250x800px|frameless|link=6B13 assault armor]] |
![[File:6B13 assault armor icon.gif|250x800px|frameless|link=6B13 assault armor]] |
||
| Line 139: | Line 127: | ||
|<font color="red">-3%</font> |
|<font color="red">-3%</font> |
||
|<font color="red">-5</font> |
|<font color="red">-5</font> |
||
| − | |10.5 |
||
|- |
|- |
||
![[File:6B23-2 armorIcon.png|250x800px|frameless|link=6B23-2 armor (mountain flora pattern)]] |
![[File:6B23-2 armorIcon.png|250x800px|frameless|link=6B23-2 armor (mountain flora pattern)]] |
||
| Line 151: | Line 138: | ||
|<font color="red">-3%</font> |
|<font color="red">-3%</font> |
||
|<font color="red">-9</font> |
|<font color="red">-9</font> |
||
| − | |7.2 |
||
|- |
|- |
||
![[File:Highcom Trooper TFO armor (multicam) icon.png|250x800px|frameless|link=Highcom Trooper TFO armor (multicam)]] |
![[File:Highcom Trooper TFO armor (multicam) icon.png|250x800px|frameless|link=Highcom Trooper TFO armor (multicam)]] |
||
| Line 163: | Line 149: | ||
|<font color="red">-2%</font> |
|<font color="red">-2%</font> |
||
|<font color="red">-3</font> |
|<font color="red">-3</font> |
||
| − | |5 |
||
|- |
|- |
||
![[File:KORUNDIcon.png|250x800px|frameless|link=BNTI Korund-VM armor]] |
![[File:KORUNDIcon.png|250x800px|frameless|link=BNTI Korund-VM armor]] |
||
| Line 175: | Line 160: | ||
|<font color="red">-9%</font> |
|<font color="red">-9%</font> |
||
|<font color="red">-10</font> |
|<font color="red">-10</font> |
||
| − | |9.8 |
||
|- |
|- |
||
![[File:FORT Redut-M body armor icon.png|250x800px|frameless|link=FORT Redut-M body armor]] |
![[File:FORT Redut-M body armor icon.png|250x800px|frameless|link=FORT Redut-M body armor]] |
||
| Line 187: | Line 171: | ||
|<font color="red">-12%</font> |
|<font color="red">-12%</font> |
||
|<font color="red">-11</font> |
|<font color="red">-11</font> |
||
| − | |13.5 |
||
|- |
|- |
||
![[File:6B13 M icon.png|250x800px|frameless|link=6B13 M assault armor (tan)]] |
![[File:6B13 M icon.png|250x800px|frameless|link=6B13 M assault armor (tan)]] |
||
| Line 199: | Line 182: | ||
|<font color="red">-3%</font> |
|<font color="red">-3%</font> |
||
|<font color="red">-5</font> |
|<font color="red">-5</font> |
||
| − | |7.5 |
||
|- |
|- |
||
![[File:Gen4hmk.png|250x800px|frameless|link=IOTV Gen4 armor (high mobility kit)]] |
![[File:Gen4hmk.png|250x800px|frameless|link=IOTV Gen4 armor (high mobility kit)]] |
||
| Line 211: | Line 193: | ||
|<font color="red">-17%</font> |
|<font color="red">-17%</font> |
||
|<font color="red">-12</font> |
|<font color="red">-12</font> |
||
| − | |13 |
||
|- |
|- |
||
![[File:GZHELKArmorIcon.png|250x800px|frameless|link=BNTI Gzhel-K armor]] |
![[File:GZHELKArmorIcon.png|250x800px|frameless|link=BNTI Gzhel-K armor]] |
||
| Line 223: | Line 204: | ||
|<font color="red">-3%</font> |
|<font color="red">-3%</font> |
||
|<font color="red">-4</font> |
|<font color="red">-4</font> |
||
| − | |8.9 |
||
|- |
|- |
||
![[File:Defender-2 Icon.png|250x800px|frameless|link=FORT Defender-2 body armor]] |
![[File:Defender-2 Icon.png|250x800px|frameless|link=FORT Defender-2 body armor]] |
||
| Line 235: | Line 215: | ||
|<font color="red">-12%</font> |
|<font color="red">-12%</font> |
||
|<font color="red">-7</font> |
|<font color="red">-7</font> |
||
| − | |11.5 |
||
|- |
|- |
||
![[File:Gen4assault.png|250x800px|frameless|link=IOTV Gen4 armor (assault kit)]] |
![[File:Gen4assault.png|250x800px|frameless|link=IOTV Gen4 armor (assault kit)]] |
||
| Line 247: | Line 226: | ||
|<font color="red">-14%</font> |
|<font color="red">-14%</font> |
||
|<font color="red">-14</font> |
|<font color="red">-14</font> |
||
| − | |15 |
||
|- |
|- |
||
![[File:IOTVfullIcon.png|250x800px|frameless|link=IOTV Gen4 armor (full protection)]] |
![[File:IOTVfullIcon.png|250x800px|frameless|link=IOTV Gen4 armor (full protection)]] |
||
| Line 259: | Line 237: | ||
|<font color="red">-19%</font> |
|<font color="red">-19%</font> |
||
|<font color="red">-22</font> |
|<font color="red">-22</font> |
||
| − | |17 |
||
|- |
|- |
||
![[File:FORT Redut-T5 body armor icon.png|250x800px|frameless|link=FORT Redut-T5 body armor]] |
![[File:FORT Redut-T5 body armor icon.png|250x800px|frameless|link=FORT Redut-T5 body armor]] |
||
| Line 271: | Line 248: | ||
|<font color="red">-15%</font> |
|<font color="red">-15%</font> |
||
|<font color="red">-14</font> |
|<font color="red">-14</font> |
||
| − | |16.5 |
||
|- |
|- |
||
![[File:5.11 Hexgrid plate carrier.png|frameless|link=5.11 Hexgrid plate carrier]] |
![[File:5.11 Hexgrid plate carrier.png|frameless|link=5.11 Hexgrid plate carrier]] |
||
| Line 283: | Line 259: | ||
|<font color="red">-2%</font> |
|<font color="red">-2%</font> |
||
|<font color="red">-1</font> |
|<font color="red">-1</font> |
||
| − | |6.2 |
||
|- |
|- |
||
![[File:THOR IC Icon.png|250x800px|frameless|link=NFM THOR Integrated Carrier body armor]] |
![[File:THOR IC Icon.png|250x800px|frameless|link=NFM THOR Integrated Carrier body armor]] |
||
| Line 295: | Line 270: | ||
|<font color="red">-16%</font> |
|<font color="red">-16%</font> |
||
|<font color="red">-20</font> |
|<font color="red">-20</font> |
||
| − | |18 |
||
|- |
|- |
||
![[File:Zhuk-6a heavy armor icon.png|250x800px|frameless|link=Zhuk-6a heavy armor]] |
![[File:Zhuk-6a heavy armor icon.png|250x800px|frameless|link=Zhuk-6a heavy armor]] |
||
| Line 307: | Line 281: | ||
|<font color="red">-5%</font> |
|<font color="red">-5%</font> |
||
|<font color="red">-6</font> |
|<font color="red">-6</font> |
||
| − | |9 |
||
|- |
|- |
||
![[File:Slick.gif|frameless|link=LBT 6094A Slick Plate Carrier]] |
![[File:Slick.gif|frameless|link=LBT 6094A Slick Plate Carrier]] |
||
| Line 319: | Line 292: | ||
|<font color="red">-2%</font> |
|<font color="red">-2%</font> |
||
|<font color="red">-1</font> |
|<font color="red">-1</font> |
||
| − | |8.6 |
||
|- |
|- |
||
![[File:FORT armor icon.png|250x800px|frameless|link=6B43 Zabralo-Sh 6A Armor]] |
![[File:FORT armor icon.png|250x800px|frameless|link=6B43 Zabralo-Sh 6A Armor]] |
||
| Line 331: | Line 303: | ||
|<font color="red">-21%</font> |
|<font color="red">-21%</font> |
||
|<font color="red">-27</font> |
|<font color="red">-27</font> |
||
| − | |20 |
||
|} |
|} |
||
| + | |||
== Upcoming Body Armor == |
== Upcoming Body Armor == |
||
{|class="wikitable" |
{|class="wikitable" |
||
Revision as of 11:52, 27 July 2021
Armor vests are worn to reduce damage from gunfire. They are often complemented with Helmets.
To learn more about the effectiveness of body armor check the Ballistics page.
Escape from Tarkov classes body armor under the Russian armor system, GOST, instead of the more well known NIJ system. (See trivia section for more info)
List
| Icon | Name | Armor class | Material | Armor zones | Durability | Effective Durability | Movement speed | Turn speed | Ergonomics |
|---|---|---|---|---|---|---|---|---|---|
| Module-3M bodyarmor | 2 | Aramid | Thorax and stomach | 40 | 160 | -3% | -3% | -1 | |
| PACA Soft Armor | 2 | Aramid | Thorax and stomach | 50 | 200 | -3% | -1% | -2 | |
| PACA Soft Armor (Rivals edition) | 2 | Aramid | Thorax and stomach | 50 | 200 | -3% | -1% | -2 | |
| 6B2 armor (flora) | 2 | Titan | Thorax and stomach | 80 | 145 | -6% | -3% | -7 | |
|
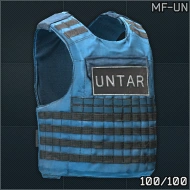
MF-UNTAR armor vest | 3 | Aluminium | Thorax and stomach | 50 | 83 | -18% | -6% | -8 |
| Zhuk-3 Press armor | 3 | UHMWPE | Thorax and stomach | 50 | 111 | -10% | -4% | -5 | |
|
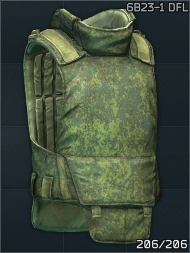
6B23-1 armor (digital flora pattern) | 3 | Steel | Thorax and stomach | 60 | 86 | -11% | -5% | -9 |
|
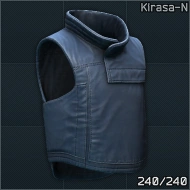
BNTI Kirasa-N armor | 3 | Combined materials | Thorax and stomach | 70 | 140 | -8% | -5% | -6 |
| NFM THOR Concealable Vest body armor | 4 | Combined Materials | Thorax and stomach | 35 | 70 | -4% | -4% | -3 | |
| 6B13 assault armor | 4 | Ceramic | Thorax and stomach | 47 | 59 | -12% | -3% | -5 | |

|
6B23-2 armor (mountain flora pattern) | 4 | Ceramic | Thorax and stomach | 55 | 69 | -11% | -3% | -9 |
| Highcom Trooper TFO armor (multicam) | 4 | UHMWPE | Thorax | 85 | 189 | -9% | -2% | -3 | |
|
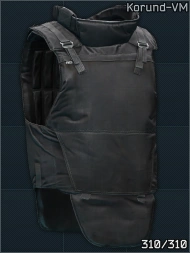
BNTI Korund-VM armor | 5 | Steel | Thorax and stomach | 45 | 64 | -18% | -9% | -10 |
| FORT Redut-M body armor | 5 | Combined materials | Thorax and stomach | 60 | 120 | -13% | -12% | -11 | |
| 6B13 M assault armor (tan) | 5 | UHMWPE | Thorax and stomach | 60 | 133 | -9% | -3% | -5 | |
|
IOTV Gen4 armor (high mobility kit) | 5 | Titan | Thorax and stomach | 65 | 118 | -11% | -17% | -12 |
|
BNTI Gzhel-K armor | 5 | Ceramic | Thorax and stomach | 65 | 81 | -10% | -3% | -4 |
| FORT Defender-2 body armor | 5 | Steel | Thorax and stomach | 70 | 100 | -9% | -12% | -7 | |
|
IOTV Gen4 armor (assault kit) | 5 | Titan | Thorax, arms and stomach | 75 | 136 | -20% | -14% | -14 |

|
IOTV Gen4 armor (full protection) | 5 | Titan | Thorax, arms and stomach | 95 | 173 | -33% | -19% | -22 |
| FORT Redut-T5 body armor | 5 | Combined materials | Thorax, arms and stomach | 100 | 200 | -37% | -15% | -14 | |

|
5.11 Hexgrid plate carrier | 6 | UHMWPE | Thorax | 50 | 111 | -8% | -2% | -1 |
| NFM THOR Integrated Carrier body armor | 6 | Combined Materials | Thorax, arms, and stomach | 55 | 110 | -36% | -16% | -20 | |
| Zhuk-6a heavy armor | 6 | Ceramic | Thorax and stomach | 75 | 94 | -13% | -5% | -6 | |

|
LBT 6094A Slick Plate Carrier | 6 | Steel | Thorax | 80 | 114 | -10% | -2% | -1 |
| 6B43 Zabralo-Sh 6A Armor | 6 | Combined materials | Thorax, arms and stomach | 85 | 170 | -42% | -21% | -27 |
Upcoming Body Armor
| Name | Image | Status |
|---|---|---|
| Shellback Tactical Banshee Elite 2.0 Plate Carrier | File:Shellback Tactical Banshee Elite 2.0 Plate Carrier.jpg | Confirmed with screenshot |
| Tasmanian Tiger Plate Carrier MK III | File:Tasmanian Tiger Plate Carrier MK III.jpg | Confirmed with screenshot |
| Tasmanian Tiger Plate Carrier SK | File:TT plate carrier SK.jpg | Confirmed with screenshot |
| Paraclete ARMIS 2.0 Plate Carrier | 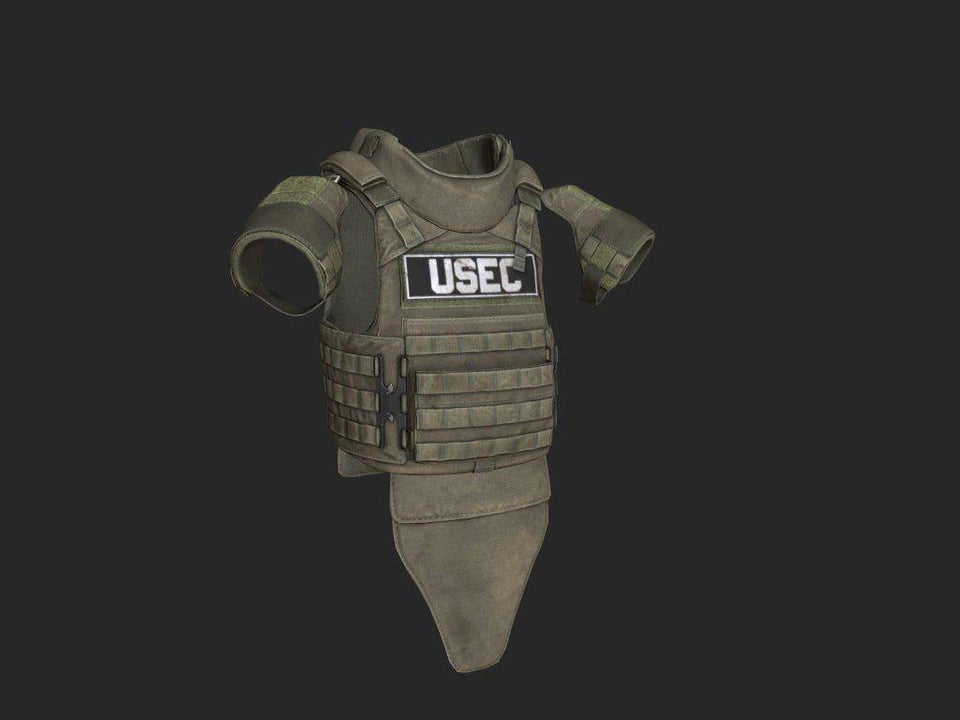
|
Confirmed with screenshot |
Trivia
- The GOST armor system is classed from 1-6a, a total of 9 ranks.
- The GOST classifications can be found here as a table.