Im Going Space (talk | contribs) (→List) |
SamWaltonBot (talk | contribs) m (Updating links to moved pages after page moves.) |
||
| (18 intermediate revisions by 11 users not shown) | |||
| Line 6: | Line 6: | ||
=List= |
=List= |
||
| − | {| class="wikitable sortable |
+ | {| class="wikitable sortable" |
| ⚫ | |||
! style="position: sticky;top: 10px;" |Icon |
! style="position: sticky;top: 10px;" |Icon |
||
! style="position: sticky;top: 10px;" |Name |
! style="position: sticky;top: 10px;" |Name |
||
| Line 18: | Line 17: | ||
! style="position: sticky;top: 10px;" |Turn speed |
! style="position: sticky;top: 10px;" |Turn speed |
||
! style="position: sticky;top: 10px;" |Ergonomics |
! style="position: sticky;top: 10px;" |Ergonomics |
||
| + | !Weight (kg) |
||
|- |
|- |
||
| − | ![[File:3M icon.png|250x800px|frameless|link=Module-3M |
+ | ![[File:3M icon.png|250x800px|frameless|link=BNTI Module-3M body armor]] |
| − | ![[Module-3M |
+ | ![[BNTI Module-3M body armor]] |
|2 |
|2 |
||
|Aramid |
|Aramid |
||
| Line 29: | Line 29: | ||
|<font color="red">-3%</font> |
|<font color="red">-3%</font> |
||
|<font color="red">-1</font> |
|<font color="red">-1</font> |
||
| ⚫ | |||
|- |
|- |
||
| − | ![[File:PACA icon.png|250x800px|frameless|link=PACA |
+ | ![[File:PACA icon.png|250x800px|frameless|link=PACA soft armor]] |
| − | ![[PACA |
+ | ![[PACA soft armor]] |
|2 |
|2 |
||
|Aramid |
|Aramid |
||
| Line 40: | Line 41: | ||
|<font color="red">-1%</font> |
|<font color="red">-1%</font> |
||
|<font color="red">-2</font> |
|<font color="red">-2</font> |
||
| + | |3.5 |
||
|- |
|- |
||
| − | ![[File:PACA |
+ | ![[File:PACA Rivals Edition icon.png|190x190px|frameless|link=PACA soft armor (Rivals Edition)]] |
| − | ![[PACA |
+ | ![[PACA soft armor (Rivals Edition)|PACA Soft Armor (Rivals edition)]] |
|2 |
|2 |
||
|Aramid |
|Aramid |
||
| Line 51: | Line 53: | ||
|<font color="red">-1%</font> |
|<font color="red">-1%</font> |
||
|<font color="red">-2</font> |
|<font color="red">-2</font> |
||
| + | | |
||
|- |
|- |
||
| − | ![[File:6B2 Icon.png|250x800px|frameless|link=6B2 armor ( |
+ | ![[File:6B2 Icon.png|250x800px|frameless|link=6B2 armor (Flora)]] |
| − | ![[6B2 armor ( |
+ | ![[6B2 armor (Flora)]] |
|2 |
|2 |
||
|Titan |
|Titan |
||
| Line 62: | Line 65: | ||
|<font color="red">-3%</font> |
|<font color="red">-3%</font> |
||
|<font color="red">-7</font> |
|<font color="red">-7</font> |
||
| + | |4.1 |
||
|- |
|- |
||
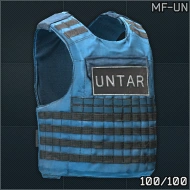
| − | ![[File:UNTARArmorIcon.png|250x800px|frameless|link=MF-UNTAR |
+ | ![[File:UNTARArmorIcon.png|250x800px|frameless|link=MF-UNTAR body armor]] |
| − | ![[MF-UNTAR |
+ | ![[MF-UNTAR body armor]] |
|3 |
|3 |
||
|Aluminium |
|Aluminium |
||
| Line 73: | Line 77: | ||
|<font color="red">-6%</font> |
|<font color="red">-6%</font> |
||
|<font color="red">-8</font> |
|<font color="red">-8</font> |
||
| + | |8.5 |
||
|- |
|- |
||
| − | ![[File:Zhuk-3 Press armor icon.png|250x800px|frameless|link=Zhuk-3 |
+ | ![[File:Zhuk-3 Press armor icon.png|250x800px|frameless|link=BNTI Zhuk-3 press armor]] |
| − | ![[Zhuk-3 |
+ | ![[BNTI Zhuk-3 press armor]] |
|3 |
|3 |
||
|UHMWPE |
|UHMWPE |
||
| Line 84: | Line 89: | ||
|<font color="red">-4%</font> |
|<font color="red">-4%</font> |
||
|<font color="red">-5</font> |
|<font color="red">-5</font> |
||
| + | |5.2 |
||
|- |
|- |
||
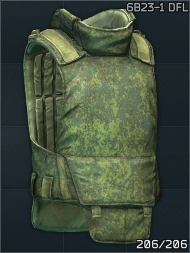
| − | ![[File:6B23-1icon.png|250x800px|frameless|link=6B23-1 armor ( |
+ | ![[File:6B23-1icon.png|250x800px|frameless|link=6B23-1 body armor (Digital Flora)]] |
| − | ![[6B23-1 armor ( |
+ | ![[6B23-1 body armor (Digital Flora)]] |
|3 |
|3 |
||
|Steel |
|Steel |
||
| Line 95: | Line 101: | ||
|<font color="red">-5%</font> |
|<font color="red">-5%</font> |
||
|<font color="red">-9</font> |
|<font color="red">-9</font> |
||
| + | |7.9 |
||
|- |
|- |
||
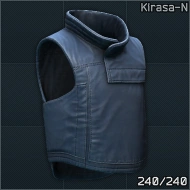
![[File:BNTIKirasaNarmorIcon.png|250x800px|frameless|link=BNTI Kirasa-N armor]] |
![[File:BNTIKirasaNarmorIcon.png|250x800px|frameless|link=BNTI Kirasa-N armor]] |
||
| Line 106: | Line 113: | ||
|<font color="red">-5%</font> |
|<font color="red">-5%</font> |
||
|<font color="red">-6</font> |
|<font color="red">-6</font> |
||
| + | |4.1 |
||
|- |
|- |
||
| − | ![[File: |
+ | ![[File:THOR Concealable Icon.png|250x800px|frameless|link=NFM THOR Concealable Vest body armor]] |
| + | ![[NFM THOR Concealable Vest body armor]] |
||
| ⚫ | |||
|4 |
|4 |
||
| + | |Combined Materials |
||
| ⚫ | |||
| − | |Thorax |
+ | |Thorax and stomach |
| − | | |
+ | | 35 |
| − | | |
+ | |70 |
| − | |<font color="red">- |
+ | |<font color="red">-4%</font> |
| − | |<font color="red">- |
+ | |<font color="red">-4%</font> |
| − | |<font color="red">- |
+ | |<font color="red">-2</font> |
| + | |9 |
||
|- |
|- |
||
![[File:6B13 assault armor icon.gif|250x800px|frameless|link=6B13 assault armor]] |
![[File:6B13 assault armor icon.gif|250x800px|frameless|link=6B13 assault armor]] |
||
| Line 128: | Line 137: | ||
|<font color="red">-3%</font> |
|<font color="red">-3%</font> |
||
|<font color="red">-5</font> |
|<font color="red">-5</font> |
||
| + | |10.5 |
||
|- |
|- |
||
| − | ![[File:6B23-2 armorIcon.png|250x800px|frameless|link=6B23-2 armor ( |
+ | ![[File:6B23-2 armorIcon.png|250x800px|frameless|link=6B23-2 armor (Mountain Flora)]] |
| − | ![[6B23-2 armor ( |
+ | ![[6B23-2 armor (Mountain Flora)]] |
|4 |
|4 |
||
|Ceramic |
|Ceramic |
||
| Line 139: | Line 149: | ||
|<font color="red">-3%</font> |
|<font color="red">-3%</font> |
||
|<font color="red">-9</font> |
|<font color="red">-9</font> |
||
| + | |7.2 |
||
| + | |- |
||
| + | ![[File:Highcom Trooper TFO armor (multicam) icon.png|250x800px|frameless|link=Highcom Trooper TFO armor (Multicam)]] |
||
| ⚫ | |||
| + | |4 |
||
| ⚫ | |||
| + | |Thorax |
||
| + | | 85 |
||
| + | |189 |
||
| + | |<font color="red">-9%</font> |
||
| + | |<font color="red">-2%</font> |
||
| + | |<font color="red">-3</font> |
||
| + | |5 |
||
|- |
|- |
||
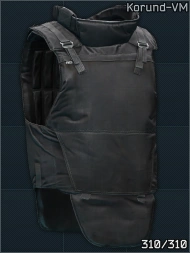
![[File:KORUNDIcon.png|250x800px|frameless|link=BNTI Korund-VM armor]] |
![[File:KORUNDIcon.png|250x800px|frameless|link=BNTI Korund-VM armor]] |
||
| Line 150: | Line 173: | ||
|<font color="red">-9%</font> |
|<font color="red">-9%</font> |
||
|<font color="red">-10</font> |
|<font color="red">-10</font> |
||
| + | |9.8 |
||
|- |
|- |
||
![[File:FORT Redut-M body armor icon.png|250x800px|frameless|link=FORT Redut-M body armor]] |
![[File:FORT Redut-M body armor icon.png|250x800px|frameless|link=FORT Redut-M body armor]] |
||
| Line 161: | Line 185: | ||
|<font color="red">-12%</font> |
|<font color="red">-12%</font> |
||
|<font color="red">-11</font> |
|<font color="red">-11</font> |
||
| + | |13.5 |
||
|- |
|- |
||
| − | ![[File:6B13 M icon.png|250x800px|frameless|link=6B13 M assault armor ( |
+ | ![[File:6B13 M icon.png|250x800px|frameless|link=6B13 M assault armor (Tan)]] |
| − | ![[6B13 M assault armor ( |
+ | ![[6B13 M assault armor (Tan)]] |
|5 |
|5 |
||
|UHMWPE |
|UHMWPE |
||
| Line 172: | Line 197: | ||
|<font color="red">-3%</font> |
|<font color="red">-3%</font> |
||
|<font color="red">-5</font> |
|<font color="red">-5</font> |
||
| + | |7.5 |
||
|- |
|- |
||
| − | ![[File:Gen4hmk.png|250x800px|frameless|link=IOTV Gen4 armor (high mobility kit)]] |
+ | ![[File:Gen4hmk.png|250x800px|frameless|link=IOTV Gen4 body armor (high mobility kit)]] |
| − | ![[IOTV Gen4 armor (high mobility kit)]] |
+ | ![[IOTV Gen4 body armor (high mobility kit)]] |
|5 |
|5 |
||
|Titan |
|Titan |
||
| Line 183: | Line 209: | ||
|<font color="red">-17%</font> |
|<font color="red">-17%</font> |
||
|<font color="red">-12</font> |
|<font color="red">-12</font> |
||
| + | |13 |
||
|- |
|- |
||
![[File:GZHELKArmorIcon.png|250x800px|frameless|link=BNTI Gzhel-K armor]] |
![[File:GZHELKArmorIcon.png|250x800px|frameless|link=BNTI Gzhel-K armor]] |
||
| Line 194: | Line 221: | ||
|<font color="red">-3%</font> |
|<font color="red">-3%</font> |
||
|<font color="red">-4</font> |
|<font color="red">-4</font> |
||
| + | |8.9 |
||
|- |
|- |
||
![[File:Defender-2 Icon.png|250x800px|frameless|link=FORT Defender-2 body armor]] |
![[File:Defender-2 Icon.png|250x800px|frameless|link=FORT Defender-2 body armor]] |
||
| Line 205: | Line 233: | ||
|<font color="red">-12%</font> |
|<font color="red">-12%</font> |
||
|<font color="red">-7</font> |
|<font color="red">-7</font> |
||
| + | |11.5 |
||
|- |
|- |
||
| − | ![[File:Gen4assault.png|250x800px|frameless|link=IOTV Gen4 armor (assault kit)]] |
+ | ![[File:Gen4assault.png|250x800px|frameless|link=IOTV Gen4 body armor (assault kit)]] |
| − | ![[IOTV Gen4 armor (assault kit)]] |
+ | ![[IOTV Gen4 body armor (assault kit)]] |
|5 |
|5 |
||
|Titan |
|Titan |
||
| Line 216: | Line 245: | ||
|<font color="red">-14%</font> |
|<font color="red">-14%</font> |
||
|<font color="red">-14</font> |
|<font color="red">-14</font> |
||
| + | |15 |
||
|- |
|- |
||
| − | ![[File:IOTVfullIcon.png|250x800px|frameless|link=IOTV Gen4 armor (full protection)]] |
+ | ![[File:IOTVfullIcon.png|250x800px|frameless|link=IOTV Gen4 body armor (full protection)]] |
| − | ![[IOTV Gen4 armor (full protection)]] |
+ | ![[IOTV Gen4 body armor (full protection)]] |
|5 |
|5 |
||
|Titan |
|Titan |
||
| Line 224: | Line 254: | ||
| 95 |
| 95 |
||
|173 |
|173 |
||
| − | |<font color="red">- |
+ | |<font color="red">-24%</font> |
|<font color="red">-19%</font> |
|<font color="red">-19%</font> |
||
|<font color="red">-22</font> |
|<font color="red">-22</font> |
||
| + | |17 |
||
|- |
|- |
||
![[File:FORT Redut-T5 body armor icon.png|250x800px|frameless|link=FORT Redut-T5 body armor]] |
![[File:FORT Redut-T5 body armor icon.png|250x800px|frameless|link=FORT Redut-T5 body armor]] |
||
| Line 238: | Line 269: | ||
|<font color="red">-15%</font> |
|<font color="red">-15%</font> |
||
|<font color="red">-14</font> |
|<font color="red">-14</font> |
||
| + | |16.5 |
||
|- |
|- |
||
| − | ![[File:5.11 Hexgrid plate carrier.png|frameless|link=5.11 Hexgrid plate carrier]] |
+ | ![[File:5.11 Hexgrid plate carrier.png|frameless|link=5.11 Tactical Hexgrid plate carrier]] |
| − | ![[5.11 Hexgrid plate carrier]] |
+ | ![[5.11 Tactical Hexgrid plate carrier]] |
|6 |
|6 |
||
|UHMWPE |
|UHMWPE |
||
| Line 249: | Line 281: | ||
|<font color="red">-2%</font> |
|<font color="red">-2%</font> |
||
|<font color="red">-1</font> |
|<font color="red">-1</font> |
||
| + | |6.2 |
||
|- |
|- |
||
| − | ![[File: |
+ | ![[File:THOR IC Icon.png|250x800px|frameless|link=NFM THOR Integrated Carrier body armor]] |
| − | ![[ |
+ | ![[NFM THOR Integrated Carrier body armor]] |
|6 |
|6 |
||
| + | |Combined Materials |
||
| ⚫ | |||
| − | |Thorax |
+ | |Thorax, arms, and stomach |
| − | | |
+ | | 55 |
| − | | |
+ | |110 |
| − | |<font color="red">- |
+ | |<font color="red">-28%</font> |
| − | |<font color="red">- |
+ | |<font color="red">-16%</font> |
| − | |<font color="red">- |
+ | |<font color="red">-20</font> |
| + | |18 |
||
|- |
|- |
||
| − | ![[File:Zhuk-6a heavy armor icon.png|250x800px|frameless|link=Zhuk-6a heavy armor]] |
+ | ![[File:Zhuk-6a heavy armor icon.png|250x800px|frameless|link=BNTI Zhuk-6a heavy armor]] |
| − | ![[Zhuk-6a heavy armor]] |
+ | ![[BNTI Zhuk-6a heavy armor]] |
|6 |
|6 |
||
|Ceramic |
|Ceramic |
||
| Line 271: | Line 305: | ||
|<font color="red">-5%</font> |
|<font color="red">-5%</font> |
||
|<font color="red">-6</font> |
|<font color="red">-6</font> |
||
| + | |9 |
||
| + | |- |
||
| + | ![[File:Slick.gif|frameless|link=LBT 6094A Slick Plate Carrier]] |
||
| + | ![[LBT 6094A Slick Plate Carrier]] |
||
| + | |6 |
||
| ⚫ | |||
| + | |Thorax |
||
| + | | 80 |
||
| + | |114 |
||
| + | |<font color="red">-10%</font> |
||
| + | |<font color="red">-2%</font> |
||
| + | |<font color="red">-1</font> |
||
| + | |8.6 |
||
|- |
|- |
||
| − | ![[File:FORT armor icon.png|250x800px|frameless|link=6B43 Zabralo-Sh 6A |
+ | ![[File:FORT armor icon.png|250x800px|frameless|link=6B43 Zabralo-Sh 6A body armor]] |
| − | ![[6B43 Zabralo-Sh 6A |
+ | ![[6B43 Zabralo-Sh 6A body armor]] |
|6 |
|6 |
||
|Combined materials |
|Combined materials |
||
| Line 279: | Line 326: | ||
|85 |
|85 |
||
|170 |
|170 |
||
| − | |<font color="red">- |
+ | |<font color="red">-35%</font> |
|<font color="red">-21%</font> |
|<font color="red">-21%</font> |
||
|<font color="red">-27</font> |
|<font color="red">-27</font> |
||
| + | |20 |
||
|} |
|} |
||
| + | |||
== Upcoming Body Armor == |
== Upcoming Body Armor == |
||
{|class="wikitable" |
{|class="wikitable" |
||
Revision as of 09:55, 20 October 2021
Armor vests are worn to reduce damage from gunfire. They are often complemented with Helmets.
To learn more about the effectiveness of body armor check the Ballistics page.
Escape from Tarkov classes body armor under the Russian armor system, GOST, instead of the more well known NIJ system. (See trivia section for more info)
List
| Icon | Name | Armor class | Material | Armor zones | Durability | Effective Durability | Movement speed | Turn speed | Ergonomics | Weight (kg) |
|---|---|---|---|---|---|---|---|---|---|---|
| BNTI Module-3M body armor | 2 | Aramid | Thorax and stomach | 40 | 160 | -3% | -3% | -1 | 6 | |
| PACA soft armor | 2 | Aramid | Thorax and stomach | 50 | 200 | -3% | -1% | -2 | 3.5 | |
| PACA Soft Armor (Rivals edition) | 2 | Aramid | Thorax and stomach | 50 | 200 | -3% | -1% | -2 | ||
| 6B2 armor (Flora) | 2 | Titan | Thorax and stomach | 80 | 145 | -6% | -3% | -7 | 4.1 | |
|
MF-UNTAR body armor | 3 | Aluminium | Thorax and stomach | 50 | 83 | -18% | -6% | -8 | 8.5 |
| BNTI Zhuk-3 press armor | 3 | UHMWPE | Thorax and stomach | 50 | 111 | -10% | -4% | -5 | 5.2 | |
|
6B23-1 body armor (Digital Flora) | 3 | Steel | Thorax and stomach | 60 | 86 | -11% | -5% | -9 | 7.9 |
|
BNTI Kirasa-N armor | 3 | Combined materials | Thorax and stomach | 70 | 140 | -8% | -5% | -6 | 4.1 |
| NFM THOR Concealable Vest body armor | 4 | Combined Materials | Thorax and stomach | 35 | 70 | -4% | -4% | -2 | 9 | |
| 6B13 assault armor | 4 | Ceramic | Thorax and stomach | 47 | 59 | -12% | -3% | -5 | 10.5 | |

|
6B23-2 armor (Mountain Flora) | 4 | Ceramic | Thorax and stomach | 55 | 69 | -11% | -3% | -9 | 7.2 |
| Highcom Trooper TFO armor (Multicam) | 4 | UHMWPE | Thorax | 85 | 189 | -9% | -2% | -3 | 5 | |
|
BNTI Korund-VM armor | 5 | Steel | Thorax and stomach | 45 | 64 | -18% | -9% | -10 | 9.8 |
| FORT Redut-M body armor | 5 | Combined materials | Thorax and stomach | 60 | 120 | -13% | -12% | -11 | 13.5 | |
| 6B13 M assault armor (Tan) | 5 | UHMWPE | Thorax and stomach | 60 | 133 | -9% | -3% | -5 | 7.5 | |
|
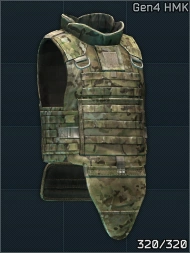
IOTV Gen4 body armor (high mobility kit) | 5 | Titan | Thorax and stomach | 65 | 118 | -11% | -17% | -12 | 13 |
|
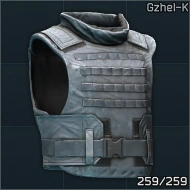
BNTI Gzhel-K armor | 5 | Ceramic | Thorax and stomach | 65 | 81 | -10% | -3% | -4 | 8.9 |
| FORT Defender-2 body armor | 5 | Steel | Thorax and stomach | 70 | 100 | -9% | -12% | -7 | 11.5 | |
|
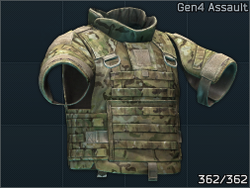
IOTV Gen4 body armor (assault kit) | 5 | Titan | Thorax, arms and stomach | 75 | 136 | -20% | -14% | -14 | 15 |

|
IOTV Gen4 body armor (full protection) | 5 | Titan | Thorax, arms and stomach | 95 | 173 | -24% | -19% | -22 | 17 |
| FORT Redut-T5 body armor | 5 | Combined materials | Thorax, arms and stomach | 100 | 200 | -37% | -15% | -14 | 16.5 | |

|
5.11 Tactical Hexgrid plate carrier | 6 | UHMWPE | Thorax | 50 | 111 | -8% | -2% | -1 | 6.2 |
| NFM THOR Integrated Carrier body armor | 6 | Combined Materials | Thorax, arms, and stomach | 55 | 110 | -28% | -16% | -20 | 18 | |
| BNTI Zhuk-6a heavy armor | 6 | Ceramic | Thorax and stomach | 75 | 94 | -13% | -5% | -6 | 9 | |

|
LBT 6094A Slick Plate Carrier | 6 | Steel | Thorax | 80 | 114 | -10% | -2% | -1 | 8.6 |
| 6B43 Zabralo-Sh 6A body armor | 6 | Combined materials | Thorax, arms and stomach | 85 | 170 | -35% | -21% | -27 | 20 |
Upcoming Body Armor
| Name | Image | Status |
|---|---|---|
| Shellback Tactical Banshee Elite 2.0 Plate Carrier | File:Shellback Tactical Banshee Elite 2.0 Plate Carrier.jpg | Confirmed with screenshot |
| Tasmanian Tiger Plate Carrier MK III | File:Tasmanian Tiger Plate Carrier MK III.jpg | Confirmed with screenshot |
| Tasmanian Tiger Plate Carrier SK | File:TT plate carrier SK.jpg | Confirmed with screenshot |
| Paraclete ARMIS 2.0 Plate Carrier | 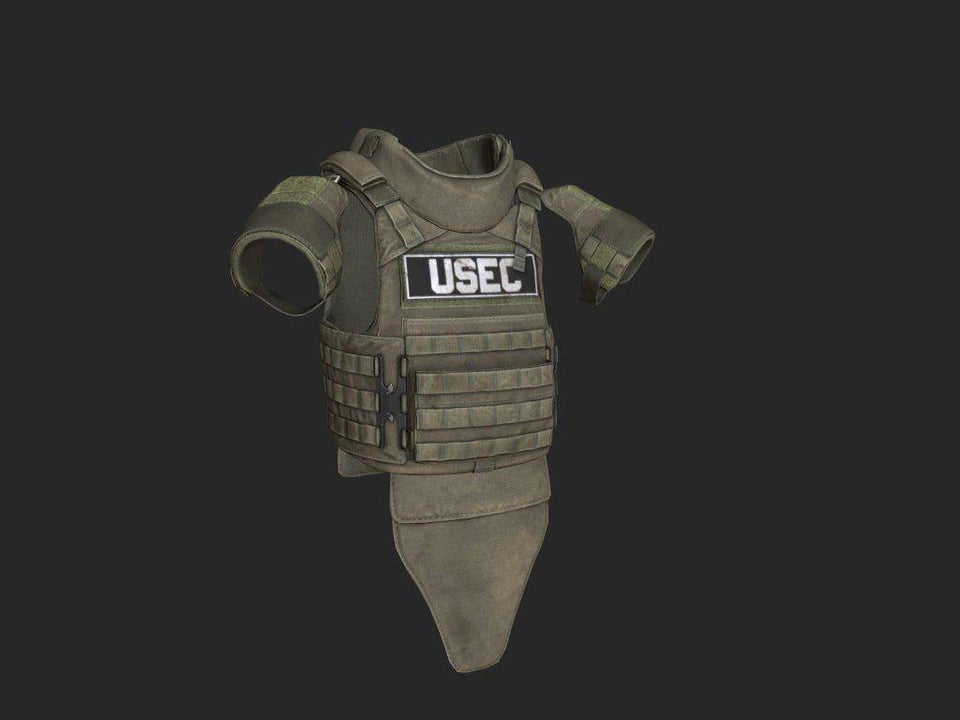
|
Confirmed with screenshot |
Trivia
- The GOST armor system is classed from 1-6a, a total of 9 ranks.
- The GOST classifications can be found here as a table.